

File sync or file synchronization is the process of copying files from one location to another. If you just copy files from the source to the destination, then it is one-way sync. If you copy files both from the source to the destination and from the destination to the source, then it is two-way sync.
Two-way sync is helpful in the following situations:
- Keep files up to date in two locations as a backup.
- Share files in a workgroup or homegroup.
Then, how to perform two-way file sync in Windows 11, 10, 8, 7 easily? A professional file sync tool is necessary.
Best two-way sync software for Windows OS
AOMEI Backupper Professional can satisfy all your needs in regard to file synchronization. There are four sync modes provided for you:
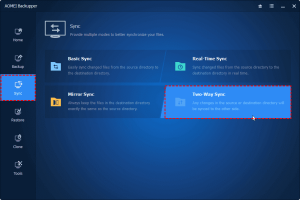
- Basic Sync: it is a one-way sync mode, which helps you copy files from the source directory to the destination directory.
- Mirror Sync: files will be exactly the same in the source and destination directory. Besides syncing files from the source to the destination, any extra files in the destination directory will be deleted.
- Two-Way Sync: files will be copied from the source directory to the destination directory and vice versa.
- Real-Time Sync: any changes happening in the source directory will be synchronized to the destination directory without delay.
What’s more, you are able to set up automatic sync tasks using the Schedule feature. There are five schedule modes available:
- Daily/Weekly/Monthly: you can set a sync task to run at a specified time point or time intervals in a day. Or you can choose a day or several days in a week or month to perform the sync task.
- Event triggers: you can specify an event to run your sync task. Four event types are offered: User logon, User logoff, System startup, and System shutdown.
- USB plug in: a sync task will run automatically when the program detects the source or destination USB drive for the sync task is plugged in.
You have learned the excellent sync features of AOMEI Backupper. How to use it to create a two-way sync task on your computer? Please move on to the next part.
Stepwise guide to run two-way file sync
In the beginning, you should do the following preparations:
- Download AOMEI Backupper and install it on your PC. The installation process will be completed in a short time.
- Get the destination location ready.
- If you want to sync local folders to a USB drive or external hard drive, connect the target drive to your computer and make sure it is recognized by Windows.
- If you want to sync files over a network, make sure you have access to the network share. Or you can create a shared folder by yourself for file synchronization.
Now follow the instructions below to create a two-way sync task:
Step 1. Load up AOMEI Backupper. Click Sync and select Two-Way Sync to enter the two-way sync configuration interface.
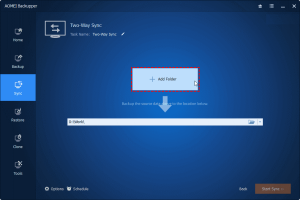
Step 2. Edit the task name so that you can easily figure out what this sync task is about. Then, click Add Folder to select the folder(s) you want to sync to another place.
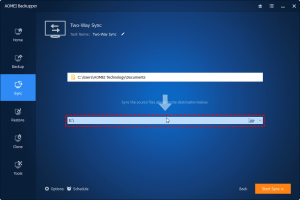
Step 3. Click the bar under “Add Folder” to specify a destination path. To synchronize files to a network share, you may expand the drop-down menu of the bar and choose Select a network location.
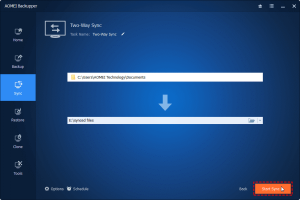
Step 4. Configure a Schedule for your sync task if needed. Click Start Sync to begin after you confirm all your settings.
Conclusion
That’s all about how to run two-way file sync in Windows 11/10/8/7. The powerful file sync software – AOMEI Backupper makes the process extremely easy for you. Whether you want to synchronize files to another place as a backup or share files over a network, AOMEI Backupper can give you a hand.
Furthermore, it is not only a file sync tool but also a computer backup utility. You can use it to create a system/disk image and backup specific files/folders as you wish. As cloud storage is enjoying a great popularity among computer users, you may also need cloud backup solutions.