

What is a drive letter?
A drive letter usually means an alphabetic character that’s assigned to a partition on your PC. There’s only one unique drive letter for each partition, which is an alphabetical identifier to the partition itself. The drive letter varies from A to Z. However, you’re not allowed to assign the same drive letter to 2 or more different partitions. Drive letter A and B are often given to floppy disks while the hard disk partitions are assigned with drive letters from C to Z. For instance, the partition where the OS lies is often assigned with C by default while other data partitions are assigned with D, E, and F.
Why change drive letter in Windows 10?
Sometimes, the drive letter won’t be displayed due to some improper operations. Problematic partitions will be shown as Document, Game, and Music. In this case, you’re supposed to give the partitions a drive letter manually. Or sometimes, you simply don’t like the drive letter assigned to the drive, then, feel free to replace it with another one.
How to change drive letter in Windows 10?
Changing drive letter in Windows 10 is not a complex job. There’re generally 3 different ways to get it done.
Way 1. Use Disk Management
Disk Management is a Windows built-in tool that is widely known by worldwide PC users. It helps manage hard disk partitions without rebooting the system and any interruptions. It can perform many disk management operations including partition formatting, partition shrinking, and drive letter changing, etc.
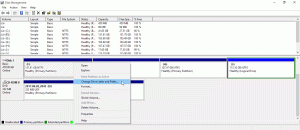
- Select “This PC” and right-click on it from the desktop and select “Manage”.
- When the Computer Management window pops up, you’ll see all hard disks and partitions appear. Right-click on the partition for which you want to change drive letter.
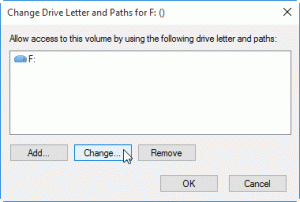
- Select “Change Drive Letter and Paths”.
4. Hit “Change”.
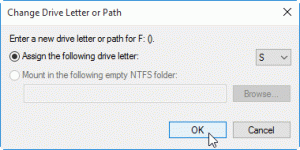
5. Select a letter in the dropdown menu and hit “OK”.
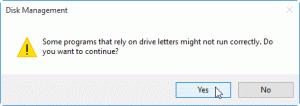
6. Confirm the pending operation by clicking on “OK”.
Wait a short while before it’s completed. Disk Management is an amazing tool if you hope to change drive letter. However, sometimes, it may not work well. For example, when you connect a hard drive to another computer, the drive letter of the disk may not be displayed and in this case, you can’t use Disk Management to add a drive letter.
Way 2. Use Command Prompt
Command Prompt is another Windows built-in program. It allows you to perform administrative tasks and resolve some certain system issues via entering command lines. And of course, you can use it to assign drive letters as well. Next, you’ll learn to change drive letter Windows 10 Command Prompt.
- Launch CMD in Windows 10: You can hit “Windows + R”, input “cmd”, and press “Ctrl + Shift + Enter” to open CMD.
- Launch DiskPart: In the popup window, input “diskpart” and hit the “ENTER” key. Then, the DiskPart command-line utility will be launched.
- Change the drive letter:
1) list volume (this command will let all volumes on your PC appear)
2) select volume * (replace “*” with the exact sequence number of the target partition)
3) assign letter * (replace “*” with a desired letter)
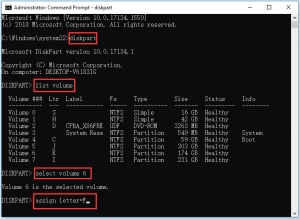
After these steps, a new letter will be assigned to the target partition.
DiskPart is so powerful that it’s able to solve any system-related problems. However, this tool is only recommended for professionals and computing experts because you must be very careful when inputting those complex command lines – once you take a wrong step, you may encounter system crash or the Windows black screen issue.
Way 3. Try third-party disk manager
If you’re a novice in computing, there is a better alternative to Disk Management and DiskPart to change drive letter in Windows 10. AOMEI Partition Assistant Standard is a powerful free partition manager that’s able to perform different disk management tasks in clicks including changing drive letter, changing serial number, and formatting partition. Moreover, this software utility is free from bundleware and popup ads unlike many of its counterparts.
How to change drive letter in Windows 10? Free download the impressive software to have a try!
Step 1. Install and launch AOMEI Partition Assistant Standard, right-click on the partition you where you want to change the drive letter, and then follow “Advanced > Change Drive Letter”.
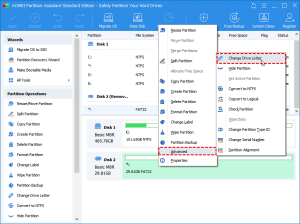
Step 2. Select a drive letter and hit “OK”.

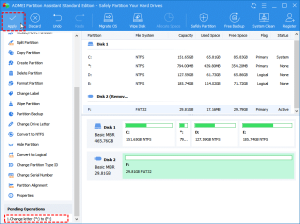
Step 3. After returning to the main interface, hit “Apply” where the screenshot shows to commit the operation.
Conclusion
In this post, 3 free methods to change drive letter in Windows 10 are listed. In Method 1, you’ll learn to use a powerful tool – Disk Management. It’s convenient but sometimes, the result is not quite satisfying; in Method 2, DiskPart is recommended for PC experts and professional users and if you are a novice, you should be very careful when using it; In Method 3, an easy-to-use and reliable partition manager – AOMEI Partition Assistant Standard is brought which enables you to finish drive letter replacement in only a few clicks.