

Introduction
Upwork is one of the most popular freelancing platforms out there, and it might seem daunting when you think about creating a site like it.
But it’s very simple and easy to set up in this day and age.
Being able to work from home is one of the most attractive perks of freelancing. With the recent increase in WFH options, people are looking to become a freelancer more than ever before.
So it’s wise to switch to the freelancing side of the business as soon as you can. But creating a platform and then managing it can be a little intimidating.
But don’t worry!
In the article, we’ll show you how to create a freelance website like Upwork, and we’ll go over some of the basic things you need to do to make sure while creating one.
To create a freelance website, I’m going to use a platform called MakeYourWP.
But why MakeYourWP?
MakeYourWP is a platform that allows you to create any type of site you want in minutes using ready-made templates.
These templates come with all the necessary features you’ll need, and the best part is that you don’t have to be a coder to create a website.
Once you launch a site on MakeYourWP, using any template (type of site) you want, your site will be up and running with all the necessary features.
All you need to do is add your own content, & your site will be ready.
Now you might ask, why should I choose MakeYourWP over other platforms?
It’s simple.
Out of all the platforms that provide these types of ready-made designs and services (which are few, to begin with) MakeYourWP is the value for money.
Each template is made by a team of professional web designers, with pre-installed plugins and themes required for your site to work smoothly.
Plus, they’ll take care of security and backups. So you don’t need to worry about maintaining your site.
Okay,
So let’s get into the actual details.
Creating a freelancer website – 5 steps.
- Launch your site
- Post a Job on the site
- Visitor posting job on your site
- Edit the contents of the site
- Get a Domain
Step 1 – Launch Your Site
So the first step is to launch your site live on the internet.
To launch your website, just click here, and it will take you to the template of ‘Freelancer Marketplace’.
Click the ‘launch site’ button and then fill up all the details accordingly.
And click Sign-Up Now.
Then click “launch new site” to launch your site.
Once launched, you need to set a name for your site.
Now, This is a temporary URL, We’ll see how to get a permanent URL (your custom domain name) later in this article.
So just enter one
And make sure the ‘Freelance’ ready-made template is selected.
Then click ‘launch new site’.
The website is now ready,
So next, you need to purchase a freelancing theme to make your site functional.
1.1 Get the freelancing website theme.
Just click here, and click ‘buy now’ to purchase the theme.
Just fill up these details and click ‘place order’.
So now we have purchased the theme.
Once you have got it, you need to activate it on your site.
1.2 Activate the theme
So to activate your theme, you need to paste a unique key you got with your theme in your wordpress dashboard.

Go to your dashboard, then premiumpress, and click ‘settings’.
Now click “license key”.
Here you need to paste the unique key you got when you purchased the theme.
So to get it,
just go to your theme account, then copy and paste it into your wordpress dashboard.
And then click ‘update’.
Once you have activated it, your freelance theme will be fully functional and have all the features needed by a freelance site.
So we can go to the next step,
Step 2 Post a job on your website.
Now to post jobs on your site, you need to do 3 steps.
2.1 Delete sample jobs
So to delete, just go to your dashboard and to “Job”.
You can see the sample jobs posted on your site. Now just click to select all the jobs and select ‘Delete’.
And then click ‘Update’
Once you have deleted all the sample posts,
We can go to the next step,
2.2 Create a job on your site
So to create a job, go back to our dashboard and click “Add Job”.
Enter the title, details, and services you will provide with the job.
Next, select your job category, or you can add your own category.
So to do that, just click “Manage” and enter the name of your new category.
Then click ‘Add New category’.
You can see a new category has been created.
Enter keywords related to your job to help your visitors to find the job easier.
Next, add an image you want.
Then go to the ‘Details’ tab → select the skills & personalities under ‘Why choose me’.
If you want, you can provide different plans for your visitors.
Here enter the details of your plan.
You can also promote your job on the Home page of your website.
Once it’s done, click ‘Save Changes’.
So the job has now been created.
So let’s say a visitor searches on your site.
Once they find the job they want, it will ask them to log in or create a new account.
Once they have done that, It will take them to the dashboard.
Now, if the visitor wants to view the details of this job, they can click here.
And can click ‘Buy Now’ to purchase the job.
But they cannot complete the purchase as you haven’t set up a payment method through which you can receive payments from your visitors/customers.
So on to the next step,
2.3 Set up a payment method using stripe.
Go to your WordPress dashboard, then to Checkout, and click on payment gateways.
You will get two payment methods available, I’m going to select ‘Stripe’
Next, you need to enter details, and you will receive payments directly to your bank account when someone purchases a job.
So to set up a stripe payment gateway,
You must create an account in Stripe and link it to your site.
You can click here, to create an account in Stripe.
After that link, the account with your site just like how we activated the premium theme (Just copy and paste the required details.)
Next, select the type of currency you want, I’m going to select “USD”.
Then, click save settings, and your stripe account will be connected to your site.
Next, the important step of creating a freelance site, which is to let others post their services (as jobs) on your site
Step 3 Visitors posting their job on your site.
Now, if you wish to allow other independent contractors to list their services on your website, you can make money every time a contractor completes a project on your site by keeping a portion of the amount as your commission and sending the remaining to the freelancer.
You can set up a commission by going to ‘House commission’ and setting the percentage you want for commission.
So to post a job on your site, they must create an account and then post their job using their account.
Choose the seller option → fill in the details → click ‘Register’ → verify their email address.
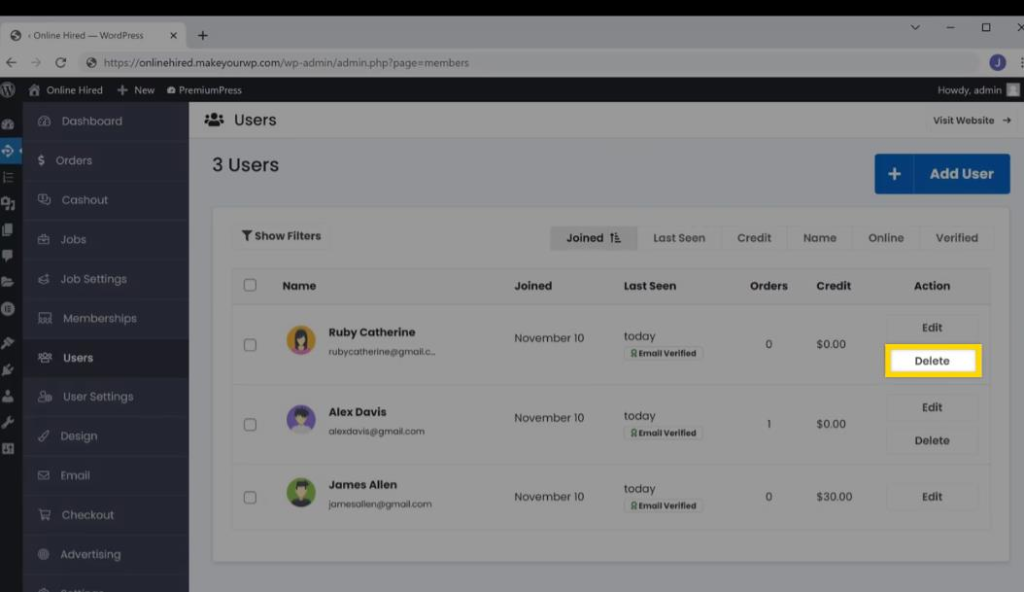
This is the place where seller can manage their jobs and orders.
When someone registers on your site as a seller, you will receive an email.
This will show us the seller who has registered on our site.
Now, if you want to remove any seller, just click delete, and they will be removed from the list.
Next, let’s see how to post a job on your site (as a seller)
3.1 Posting a job on your website
The seller can now publish jobs on your website after setting up an account. They can then click “Post job” on their dashboard and will be sent to this page. They can now enter the employment information here and click “save.”
You will get an email in your inbox whenever a vendor publishes a position. However, until you authorize the task, the seller’s job will not be shown on your website.
So you need to open the email you just received in our mailbox.
Once you click it, you’ll be taken to the jobs page, where you can browse all the openings and wait for approval.
Now to approve the seller’s job → click Actions → click edit → Pending approval → status to live.
Click “save changes” and the job will be displayed on your site.
So now visitors can view and purchase the job.
Once a visitor purchases a job, the seller needs to accept it.
Once the seller accepts, the customer will receive a mail about the order status.
After that, once the seller completes the job, they can deliver the product to the customer by sending a link or attaching a file through the site itself.
Next, the customer needs to verify the product and then approve it, once they are satisfied with the product,
Once they approve, the seller can see the amount sent by the customer and the percentage of the amount taken by the admin (which is you) as a commission.
Now, if the seller wants the money, he can request the amount from the admin (you).
Now you need to send the payment to the seller (after the seller requests the amount from you either through PayPal or directly to their bank account), and you need to send the remaining amount after deducting the percentage of your commission.
The seller can also promote their job on your homepage by paying you.
This is beneficial for both the seller and you.
Okay.
So far, we have covered the most essential parts of creating a freelancer site.
Next, let’s see how to edit the content of your site.
Step 4 Editing the contents of your site.
You can edit any page of your site using ‘Elementor’
So to edit any page, just go to the page you want to edit
And click ‘Edit with Elementor’
Now to change the homepage,
Go to ‘Design’ → ‘Manage Website Pages’ → ‘Homepage’
Now to edit the text
Just select the text that you want to change and replace it with the text you want.
Next, if you want to change the image
Just click on it
And then use the options to upload the image you want
Next, if you want to change the logo.
Just go to ‘logos and fonts’ and click ‘select logo’
And then upload the logo you want
Now our site is almost ready, and the only thing we need to do is to get a custom domain.
Step 5 Setting up a custom domain.
So to set up a custom domain, we’re going to do 2 steps.
As we discussed before, right now, you only have a temporary domain on your site.
So to set a custom domain for your site.
First, you need to get the domain name you want for your site.
5.1 Purchasing the custom Domain
So to get a custom domain, just click here
It will take you to the WebSpaceKit platform, where you can get your custom domain name.
So just enter the domain.
If it’s available, just go ahead and purchase it.
Once you have purchased your custom domain
5.2 Adding your custom domain to the site
First, we need to add this domain to your MakeYourWP site.
So let’s go to the MakeYourWP dashboard.
And to domains
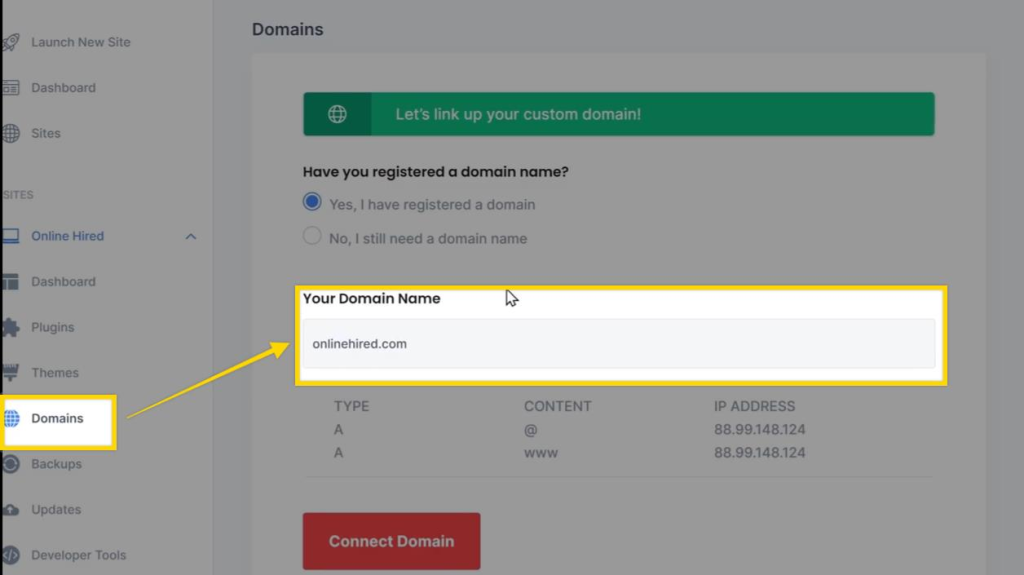
Enter the domain name here
Next, we need to add the IP address of your MakeYourWP site to the WSK domain page.
So let’s go to the WSK dashboard.
Go to ‘Domains’
Click on the options and go to ‘Manage DNS’
Now here, copy and paste the IP address from your MakeYourWP site.
So just copy and paste the details.
Then click ‘Save Changes’
Now go to MakeYourWP and click ‘Connect Domain’
That’s it.
Your site will have the custom domain which you wanted.
Okay,
So far, we have seen how to get your own freelancer site up and running.
Next, let’s look at the cost of creating a freelancer site.
Cost of creating a Freelancer site.
You have 2 options upfront for creating a freelancer site.
- Hiring a developer/company to create one for you
- Creating on your own
1. Hiring a developer/company
Hiring a freelancer to create your site costs around 10-15 USD/hour and will take many hours, whereas, with MakeYourWP, it will cost only 5 USD/month.
The only advantage of hiring a developer is that it’s a one-time payment, though it costs way higher.
But the more significant disadvantage is you are stuck with the platform they choose to build your site, and you will have no way of managing it.
You probably need to hire a 3rd party to manage your site’s security and constant updates, which will cost even more. This defeats the point of a one-time payment for the site.
You will also be constantly dependent on a 3rd person to make changes.
With these, it is safe to say MakeYourWP costs way less and gives you control over your site.
2. Creating on your own
As we already discussed, creating the site on your own is cost-efficient and will benefit us in the long run.
But there are many options to help you create a site on your own.
Luckily, we went through it all, so you don’t have to go through the misery of researching all the options.
As we said before, MakeYourWP had the best features for the pricing, making it a value-for-money option.
And that led us to make this blog, so you can launch your own site in minutes without spending much.
Conclusion
Whatever you choose to do, consistent work is necessary to succeed. Building a freelance website is the start, you need to put in the effort to promote your site’s reach and gain a client base. You need both freelancers and visitors to run a successful freelance marketplace.
Once you have created your site, you need to focus on SEO and marketing to make your online presence.
This article has covered how you can create your own Freelancer site with a step-by-step process, and I hope it was helpful.
Feel free to share this article with your friends whom you think might need this!